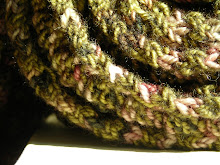
 Opening presents at my house this Christmas went a lot like this:
Family member (holding a wrapped gift): A present from Dr. B.! (unwraps gift. pulls out ball of yarn. looks puzzled.)
Me: That's gonna be a hat.
FM: Oh.
Me: Yeah!
FM: Um.
Me: Just give that back to me.
FM: So... it's a placeholder? Or... am I really getting a hat made of this yarn?
Me: I thought I'd use that yarn.
FM: Oh.
Me: No?
FM: I was hoping for a Star Wars hat.
Well. That was just my wasband. Other family members got other gifts in various states of completion. Sock tubes for some. Half-made heating pad covers for others. People really got the hang of it after a while, and I didn't even have to tell them to give the stuff back to me. They would just say, "Wow! A sock!" and hand it right back over, needles sticking out and all. I think it went swimmingly!
One of those gifts-in-progress was for my crafty SIL. I've been showing you bits and pieces of it for a little while. I can now reveal more, since she has kindly performed the requisite oohing-and-ahhhing-and-returning-it-to-me ritual.
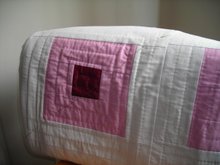
Here's a full (pre-quilting, pre-applique) shot of the top:

This is my second "interpretation" of the Denyse Schmidt "Hold Me Close Heating Pad Cover" from her book. The last time I made one, I vowed not to wing it the next time. I think I said I'd be much better off just using the pattern.
You know what I rarely do? Learn.
A couple of months ago, on an episode of Simply Quilts, a genius lady was demonstrating how to make these log-cabin style flowers that are all wonky. No pattern. No measuring. Just easy. Addictive. And, if done well, the perfect heating pad cover.
(That last one was all me. She was making actual quilts.)
So, I went back to Denyse's basic specs for the size of the back. But, rather than follow her pattern for the top, I used that genius lady's technique and made a pink "flower" in the center and then surrounded it with "leaves." See that up there? Beautiful! I cut the top to size, per Denyse's instructions. And, so far so good.
But when it came to the quilting part, I was stumped. The customary stitch-in-the-ditch didn't seem right here. So, I poked around and came across this. See all the irregular circles in the stitching there? Well. I thought that'd be perfect. Uneven circles with maybe some leaf-type shapes would be awesome. If Denyse can do it, why can't I?
Oh, yes. I took another step that could've proved disastrous. Faced with indecision about what marking tool to use for said circles and leaves, I decided to quilt freehand. I stitched right into the quilt sandwich (in this case: pieced fabric top, batting, and muslin) without any lines drawn on to follow.

One woman's brave is another's lazy. Please don't be confused. This was all lazy.
Oh, and any real quilter will tell you that my stitches are about twelve hundred times too long. The real quilters make tiny little stitches that you don't even really see. But I'm not a real quilter. I'm but one woman.
My limitations aside, some of the circles didn't come out that uneven -- which freaked me out, frankly.

Ok. Let me be clear here. This project should've taken about three and a half seconds. But, with this kooky idea of quilting circles and leaves all freehand-like, it's taken a great deal longer. Look. Here's the back:
 One piece of fabric. Marked with that Hera marking tool I told you about (which is great, by the way!). Hand-quilted along the lines. Super quick. You could very easily make the front and back simple, and you'd be cranking these things out fast, mister!
So, the next step for me is to sew the front to the back and see how I'm feeling about the applique part. That would be the part wherein I would use things I've never used like "Wonder Under" and "needle-turning" and who knows what, adding that extra cut-out flower and leaves to the top. I may skip that part. We'll see.
Here's what I'd say, though. Who doesn't need a nice new heating pad cover? Think of your own. Do you even have one? How does it look? Well.
I think it's the gift to give in '07. There. I said it.
Unless of course, everyone in your life wants Star Wars hats. In which case, I can't really help you with that one.


11 comments:
The heating pad cover is adorable! What a clever idea--So crafty and so useful. Every picture I take of my dogs has the same blue, pilled heating pad in the picture.
I said, "picture" twice in the same sentence. What a "turkey"!
Now my hubby is bugging me for a Dr. Who scarf! Why can't he just be happy with his star wars hat?
Log cabins are my favorite kinds of quilts. You have a wonderful eye for colors for your quilts - I'm so envious! BTW - It's more how "even" your stitches are then how tiny they are. You stitches look pretty great to me! You make me want to start quilting again.
What? You're HAND stitching the entire thing?? (It's beautiful btw.)
It's so pretty! Ditto what Tiennie said about stitch quality, your stitches look nice and even to me. There's even a legitimate style of quilting ("utility quilting" is one term for it, blah as that phrase is) that deliberately uses big in-your-face stitches.
Very pretty. And your stitches look great to me. Lovely color choices as well.
That is beautiful. I've always been mystified by the quilting. It seems so tedious. Maybe I could knit a heating pad cover...
Words cannot express how FULL ON CUTE my heating pad cover to be is in person. I have been warning my heating pad not to get TOO excited when he sees the cover because he actually may be to skanky to wear such a fabulous cover. There may not BE a heating pad in the WORLD that's good enough for such a cover as this. THIS cover may have to hang all museum like with special lights that won't cause fading.
Aw shucks, you guys. Thank you for all those kind words. It's SO sweet of you all to be so supportive and encouraging. I'm really excited to hear your thoughts on the final stage of it.
I am new to quilting. I love your heating pad cover. Did you quilt the front and back separately and then sew them together??? I have wondered if you could do that and if so, what keeps it from like sagging apart?
Hey Charmaine! I'm also quite new to quilting. For this, I followed the Denyse Schmidt pattern and hand quilted two quilt sandwiches -- one for the front and one for the back. Then I machine-sewed the front to the back (right sides together) with a 1/2" seam allowance along three sides, leaving the top open. When you turn the whole thing right-side out, it's smooth as can be... no sagging.
Maybe you were thinking I assembled the front to the back by hand-stitching it, and that that would make for some sags?
There are more complete photos in later posts that might be clearer. Just click on "quilting" in the sidebar, and you'll see them. Hope that helps!
Post a Comment